文章
Zeev Kwan
2023年05月07日

Introduction
As energy costs continue to rise and concerns about the environment grow, many homeowners are looking for ways to make their homes more energy-efficient. Energy-efficient homes not only help reduce energy bills, but they also help reduce carbon emissions and preserve natural resources. In this article, we'll explore some of the most effective energy-efficient home solutions and tips for saving money and the environment.Insulation
One of the most effective ways to make your home more energy-efficient is to add insulation. Insulation helps keep warm air inside during the winter and cool air inside during the summer, reducing the need for heating and air conditioning.There are several types of insulation available, including batt, blown-in, and spray foam insulation. Each type has its own advantages and disadvantages, so it's important to choose the right type for your home and budget.
Windows
Replacing old, inefficient windows with new, energy-efficient ones is another effective way to reduce energy costs and improve home comfort. Energy-efficient windows are designed to prevent heat transfer, reducing the need for heating and air conditioning.Look for windows with a high energy-efficiency rating, such as those with the ENERGY STAR label. Additionally, consider adding window treatments, such as blinds or curtains, to further reduce heat transfer.
Lighting
Switching to energy-efficient lighting is another effective way to save money and reduce energy use. LED (light-emitting diode) bulbs use up to 80% less energy than traditional incandescent bulbs and can last up to 25 times longer.LED bulbs are available in a variety of shapes and sizes, making them suitable for virtually any lighting application. Additionally, they emit less heat than traditional bulbs, reducing the need for air conditioning during the summer.
Appliances
Old, inefficient appliances can use a lot of energy and contribute to high energy bills. When shopping for new appliances, look for those with the ENERGY STAR label, which indicates that they meet strict energy-efficiency guidelines.Additionally, consider upgrading to energy-efficient heating and cooling systems, such as heat pumps or geothermal systems. These systems use less energy than traditional heating and cooling systems, reducing energy costs and carbon emissions.
Renewable Energy
Adding renewable energy sources to your home, such as solar panels or wind turbines, is another effective way to reduce energy costs and carbon emissions. While these systems can be expensive to install, they can pay for themselves over time in energy savings.Additionally, many states and municipalities offer incentives and rebates for homeowners who install renewable energy systems, making them more affordable.
Conclusion
Making your home more energy-efficient is a smart investment that can save you money and help protect the environment. By adding insulation, replacing old windows, switching to energy-efficient lighting and appliances, and adding renewable energy sources, you can reduce energy costs and carbon emissions while improving home comfort.Remember, making your home more energy-efficient is a journey, and it may take time to implement all of these solutions. Start with the solutions that make the most sense for your home and budget, and work your way up from there. With patience and perseverance, you can create an energy-efficient home that is comfortable, affordable, and environmentally responsible.
0
0
文章
atastybellpepper
2022年07月21日

You may make decisions about what has to be done to make your soil suitable for the plants you wish to grow by learning as much as you can about it. You may prevent the disappointing outcomes that can happen when your soil is improper for your ideal garden if you can learn about the texture, composition, drainage, acidity, and mineral density of your soil.
Take a handful of damp, but not wet, soil from your garden, and give it a good squeeze to assess the sort of soil you have. Open your hand now. Any one of the following will occur:
1. It will maintain its form, but if you lightly poke it, it will collapse. You are fortunate to have rich loam, so!
2. It will maintain its form and clings obstinately to your hand when prodded. You have clay soil, then.
3. As soon as you open your palm, it will crumble. You have sandy soil, thus this indicates.
You may try to improve your soil now that you are aware of the kind you have.
1. Make a hole that is a foot deep and six inches broad.
2. Water should entirely drain after being poured into the hole.
3. Once again, fill it with water.
4. Note the length of time it takes for the water to drain.
You have poor drainage if it takes the water more than four hours to drain.

1. Check to see whether the soil has reached a temperature of at least 55 degrees and is at least moderately damp, but not drenched.
2. Create a hole that is one foot wide and one foot deep. Put the dirt on a piece of cardboard or a sheet.
3. As you re-fill the hole with dirt, sift it with your hands and count the earthworms as you go.
Your soil is in excellent condition if you detect at least 10 worms. Less than that might mean that your soil is either too acidic or alkaline, or that there isn't enough organic matter to maintain a robust worm population.
pH test kits are available at any garden and home store. These kits are quite accurate, but you must carefully adhere to the testing guidelines. You may start trying to fix the issue after you determine if the pH of your soil is a problem or not.
The next step is to get in touch with your local cooperative extension office if you discover that after doing all of these tests and amending the soil as necessary to address the problems, your plants are still having a hard time. They'll explain how to get a soil sample and submit it to their lab for examination. They will provide a report with recommendations on how to address any mineral shortages in your soil.
These tests are easy and affordable methods to make sure your garden has the finest possible foundation.
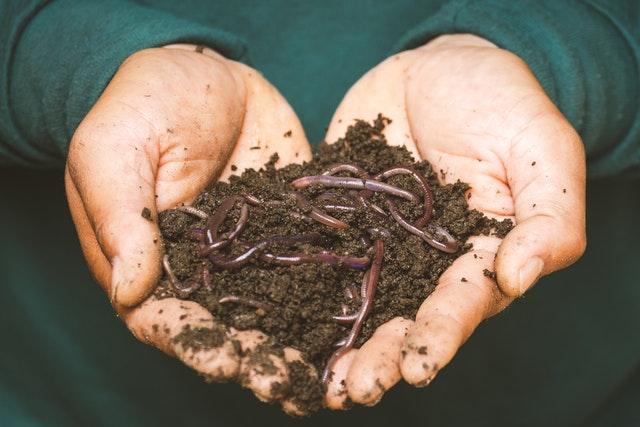
Test One: Squeeze Test
The composition of soil is one of its most fundamental properties. Soils are often categorized as clay, sandy, or loamy soils. Although rich in nutrients, clay drains slowly. Sand drains quickly but has a hard time holding onto moisture and nutrients. Because it holds onto moisture and nutrients without becoming permanently wet, loam is often regarded as the optimum soil type.Take a handful of damp, but not wet, soil from your garden, and give it a good squeeze to assess the sort of soil you have. Open your hand now. Any one of the following will occur:
1. It will maintain its form, but if you lightly poke it, it will collapse. You are fortunate to have rich loam, so!
2. It will maintain its form and clings obstinately to your hand when prodded. You have clay soil, then.
3. As soon as you open your palm, it will crumble. You have sandy soil, thus this indicates.
You may try to improve your soil now that you are aware of the kind you have.
Test Two: The Percolation Test in Soil
Identifying whether or not you have drainage issues is also crucial. If their roots remain too damp, certain plants, including several culinary herbs, may ultimately perish. Test the drainage of your soil here:1. Make a hole that is a foot deep and six inches broad.
2. Water should entirely drain after being poured into the hole.
3. Once again, fill it with water.
4. Note the length of time it takes for the water to drain.
You have poor drainage if it takes the water more than four hours to drain.
Test Three: The Worm Test in Soil Testing
Worms are excellent indicators of the biological activity and general health of your soil. The likelihood is that if you have earthworms, you also have all of the helpful bacteria that promote healthy soil and robust plants. Making the worm test:1. Check to see whether the soil has reached a temperature of at least 55 degrees and is at least moderately damp, but not drenched.
2. Create a hole that is one foot wide and one foot deep. Put the dirt on a piece of cardboard or a sheet.
3. As you re-fill the hole with dirt, sift it with your hands and count the earthworms as you go.
Your soil is in excellent condition if you detect at least 10 worms. Less than that might mean that your soil is either too acidic or alkaline, or that there isn't enough organic matter to maintain a robust worm population.
Test Four: Soil's pH Test
Your soil's pH (acidity level) has a significant impact on how effectively your plants develop. The pH scale ranges from 0 to 14, with 0 being very acidic and 14 being extremely alkaline. Most plants thrive in soil that has a pH between six and seven, which is quite neutral. Plants just won't grow as well as they should if the pH is more than eight or less than five.pH test kits are available at any garden and home store. These kits are quite accurate, but you must carefully adhere to the testing guidelines. You may start trying to fix the issue after you determine if the pH of your soil is a problem or not.
The next step is to get in touch with your local cooperative extension office if you discover that after doing all of these tests and amending the soil as necessary to address the problems, your plants are still having a hard time. They'll explain how to get a soil sample and submit it to their lab for examination. They will provide a report with recommendations on how to address any mineral shortages in your soil.
These tests are easy and affordable methods to make sure your garden has the finest possible foundation.
0
0
文章
atastybellpepper
2022年07月17日
You should really be able to grow plants even if you reside in a small flat. In addition to common houseplants, an apartment garden may support a variety of herbs, fruits, and vegetables. When you're just learning how to plant, start with a few small pots. Considerations like sunlight exposure and the overall weight of your containers must be made. Here's how to create a beautiful apartment garden.
1. Soil
Water, oxygen, and nutrients are all provided for plants by their soil. You can't use regular garden soil since it would clump in pots, restricting access to oxygen and preventing water from flowing through. This is because your apartment garden will probably incorporate containers. Consequently, a potting mix that drains effectively is required. Potting mix is airy and light, effectively moving oxygen and water to maintain healthy roots. You won't need to be concerned about bringing illnesses or bugs into your flat since it is reasonably sanitary.
2. Water
Container plants need a lot of water, often many times each day. So choose a location for your container garden that is close to a water source. Carrying watering cans can get tiresome, particularly if you need to water many containers at once. If your arrangement allows it, think about getting a hose that can be connected to a sink faucet. When you need it, it is convenient, and when you don't, it coils up.
3. Sunlight
The majority of blooming and fruiting plants need a full day of sunlight. This translates to six to eight hours of direct sunlight each day. Especially in a city where towering buildings might obstruct the sun for at least part of the day, this can be difficult to find in an apartment. The greatest chances of getting full sun are on balconies and roofs. If you're planting on a windowsill, you have two options: either choose plants that don't need as much light, like certain herbs and salad greens, or add a grow light to simulate the sun's rays.
4. Humidity
When the heat is on, you may need to add some additional humidity if you are growing your plants inside on a ledge. You may either put the plants on a tray of water or spritz them with a light mist to aid.
5. Wind
Your plant pots may need additional protection if your plants will be exposed to strong winds, particularly if they will be on a rooftop or balcony. Wind has the power to rip apart foliage and topple pots. So make a wind barrier available, such a screen or railing. Alternately, make sure your pots are large and substantial enough to secure the plants.
6. Weight
Although soil-filled containers are already heavy, their weight might increase by three times when they are saturated with water. Make sure the position of your apartment's garden can support the weight. It will be necessary to fasten window boxes to the windowsill. Additionally, find out if there are any weight limitations from your landlord or the building board if you're gardening on a balcony or rooftop.

1. Herbs: Many herbs perform well in containers, but they won't become as big and bushy as they would if they were planted in the ground outside. Additionally, if you harvest regularly, you may need to replace your plants. But having access to fresh herbs while cooking is amazing. Mint, chives, parsley, lavender, basil, thyme, and other herbs are some of the best plants for apartment gardening.
lettuce greens Favorite salad ingredients like lettuce, spinach, and arugula are shallow-rooted, quickly growing plants. If they have enough water, they aren't too picky about their growth circumstances.
2. Tomatoes: Although tomato plants may become bulky and heavy, they thrive in containers. They will thrive in a container with a minimum diameter of 14 inches, however bigger is preferable. The patio varieties may be grown in a hanging basket. Make careful you choose a determinate or dwarf tomato variety.
3. Chili peppers: If you like spice, hot pepper plants do extremely well in containers and may produce fruit all year long. Sweet peppers may also be grown in containers, although they normally don't perform as well as hot peppers.
4. Meyer lemons: Dwarf citrus trees are among the simplest fruits to cultivate in a container. If they get six to eight hours of direct sunlight each day combined with some humidity, meyer lemons thrive inside. Lemon trees emit a sticky sap, so place something beneath the pot to protect your floors and furnishings.
5. Strawberry: A window box filled with strawberries is both aesthetically pleasing and appetizing. For the greatest fruit, strawberry plants typically need at least six hours of sunlight every day and continuously damp (but not soggy) soil.
Watering is by far the most crucial gardening chore. Even if rain falls on your garden, there most likely won't be enough water. As your plant develops, the dirt in containers dries up rapidly. Use your finger to probe the dirt about an inch or so below the surface. It needs watering if it seems dry.
1. Feeding: In accordance with each plant's specific growth needs, you must feed your plants on a regular basis. The simplest technique is often to apply a water-soluble fertilizer when you water. Inspect your potting mix to see whether it contains fertilizer; if it does, you won't need to feed your plants as often.
2. Problems: No matter where you cultivate plants, pests and illnesses will eventually find them, and there are no natural predators for insects inside. Every time you water or harvest your plants, check them for issues. Move a plant away from the other plants until the issue is fixed if you see evidence of pests or illnesses, such as discoloration or holes in the leaves.
3. Harvesting: Find out when your particular plants are ready to be picked, and then don't put off enjoying the rewards of your toil. In certain circumstances, harvesting encourages the plant to grow more food that you can collect.
There isn't usually a ton of room available in apartments for gardening. However, there will inevitably be a sunny spot where you may exercise your green thumb and sample the results of your effort.
Apartment Plant Growing Instructions
All plants have certain growth conditions that must be fulfilled, while some are more resilient and forgiving to novice gardeners than others. When selecting plants for your apartment garden, keep the following factors in mind:1. Soil
Water, oxygen, and nutrients are all provided for plants by their soil. You can't use regular garden soil since it would clump in pots, restricting access to oxygen and preventing water from flowing through. This is because your apartment garden will probably incorporate containers. Consequently, a potting mix that drains effectively is required. Potting mix is airy and light, effectively moving oxygen and water to maintain healthy roots. You won't need to be concerned about bringing illnesses or bugs into your flat since it is reasonably sanitary.
2. Water
Container plants need a lot of water, often many times each day. So choose a location for your container garden that is close to a water source. Carrying watering cans can get tiresome, particularly if you need to water many containers at once. If your arrangement allows it, think about getting a hose that can be connected to a sink faucet. When you need it, it is convenient, and when you don't, it coils up.
3. Sunlight
The majority of blooming and fruiting plants need a full day of sunlight. This translates to six to eight hours of direct sunlight each day. Especially in a city where towering buildings might obstruct the sun for at least part of the day, this can be difficult to find in an apartment. The greatest chances of getting full sun are on balconies and roofs. If you're planting on a windowsill, you have two options: either choose plants that don't need as much light, like certain herbs and salad greens, or add a grow light to simulate the sun's rays.
4. Humidity
When the heat is on, you may need to add some additional humidity if you are growing your plants inside on a ledge. You may either put the plants on a tray of water or spritz them with a light mist to aid.
5. Wind
Your plant pots may need additional protection if your plants will be exposed to strong winds, particularly if they will be on a rooftop or balcony. Wind has the power to rip apart foliage and topple pots. So make a wind barrier available, such a screen or railing. Alternately, make sure your pots are large and substantial enough to secure the plants.
6. Weight
Although soil-filled containers are already heavy, their weight might increase by three times when they are saturated with water. Make sure the position of your apartment's garden can support the weight. It will be necessary to fasten window boxes to the windowsill. Additionally, find out if there are any weight limitations from your landlord or the building board if you're gardening on a balcony or rooftop.
Suitable Plants for Apartments
To a certain degree, almost every plant may be grown in a container. A full-sized apple tree, for instance, would not be feasible, but there are thin columnar types that can fit in a one-square-foot section of your balcony. After considering the foods you love eating, choose a few different plant varieties to try out. You may begin with seeds, which are more diverse and less expensive. However, young nursery plants will help your garden get started faster.1. Herbs: Many herbs perform well in containers, but they won't become as big and bushy as they would if they were planted in the ground outside. Additionally, if you harvest regularly, you may need to replace your plants. But having access to fresh herbs while cooking is amazing. Mint, chives, parsley, lavender, basil, thyme, and other herbs are some of the best plants for apartment gardening.
lettuce greens Favorite salad ingredients like lettuce, spinach, and arugula are shallow-rooted, quickly growing plants. If they have enough water, they aren't too picky about their growth circumstances.
2. Tomatoes: Although tomato plants may become bulky and heavy, they thrive in containers. They will thrive in a container with a minimum diameter of 14 inches, however bigger is preferable. The patio varieties may be grown in a hanging basket. Make careful you choose a determinate or dwarf tomato variety.
3. Chili peppers: If you like spice, hot pepper plants do extremely well in containers and may produce fruit all year long. Sweet peppers may also be grown in containers, although they normally don't perform as well as hot peppers.
4. Meyer lemons: Dwarf citrus trees are among the simplest fruits to cultivate in a container. If they get six to eight hours of direct sunlight each day combined with some humidity, meyer lemons thrive inside. Lemon trees emit a sticky sap, so place something beneath the pot to protect your floors and furnishings.
5. Strawberry: A window box filled with strawberries is both aesthetically pleasing and appetizing. For the greatest fruit, strawberry plants typically need at least six hours of sunlight every day and continuously damp (but not soggy) soil.
Garden Care for Apartments
You may anticipate doing the following duties on a regular basis in your apartment garden:Watering is by far the most crucial gardening chore. Even if rain falls on your garden, there most likely won't be enough water. As your plant develops, the dirt in containers dries up rapidly. Use your finger to probe the dirt about an inch or so below the surface. It needs watering if it seems dry.
1. Feeding: In accordance with each plant's specific growth needs, you must feed your plants on a regular basis. The simplest technique is often to apply a water-soluble fertilizer when you water. Inspect your potting mix to see whether it contains fertilizer; if it does, you won't need to feed your plants as often.
2. Problems: No matter where you cultivate plants, pests and illnesses will eventually find them, and there are no natural predators for insects inside. Every time you water or harvest your plants, check them for issues. Move a plant away from the other plants until the issue is fixed if you see evidence of pests or illnesses, such as discoloration or holes in the leaves.
3. Harvesting: Find out when your particular plants are ready to be picked, and then don't put off enjoying the rewards of your toil. In certain circumstances, harvesting encourages the plant to grow more food that you can collect.
There isn't usually a ton of room available in apartments for gardening. However, there will inevitably be a sunny spot where you may exercise your green thumb and sample the results of your effort.
1
1
sososo:wow!I just saw this article when I was about to grow some flowers.😍
atastybellpepper:Great article
文章
atastybellpepper
2022年07月04日
A hybrid type of Lagerstroemia known most often as the crape (or crepe) myrtle, the Acoma crape myrtle is a member of the genus Lagerstroemia. This specific type is known to only grow to a height of around ten feet and is commonly described as remaining short in size and seeming more shrub-like than tree-like.
These plants are excellent choices for planting in suburban or urban areas. Due to its compact size, it is a great choice for gardens and lawns. It may also be used into a landscaping strategy for businesses. Additionally, this cultivar has increased resilience to powdery mildew, which certain crape myrtle plants often struggle with.
Name of the plant: Lagerstroemia x "Acoma"
Name of the plant: Lagerstroemia x "Acoma"
Plant Type Common Name Acoma Crape Myrtle 2 to 10 feet tall and 2 to 10 feet broad when fully grown
UV Radiation whole sun
Type of Soil Well-draining
pH of the Soil: Acidic to Neutral
Bloom Seasons Spring and summer
White Flower Hardiness Zones 7 to 9 Native Country Australia and Asia
How to Grow Crape Myrtle in Acoma
The cultivation of the Acoma crape myrtle is gratifying since it yields weeping branches covered in rich foliage and lovely blossoms. Although this cultivar needs a lot of sun, it thrives in a range of soil types and only need little water or fertilizer.
These trees are expected to grow at a medium pace, so you'll have plenty of time to observe their development. Just keep in mind that there won't be much more for you to do than observe; the Acoma crepe myrtle just needs its bottom branches sometimes pruned.
Light
Crape myrtle needs full light to flourish to its greatest capacity. Crape myrtles are well recognized for their stunning flowers, so to get the most out of the blossoming show, make sure they get at least six hours of light each day.
Soil The crape myrtle may grow in a variety of soil types, such as loam, clay, or sandy soils as long as the area has good drainage. These plants may thrive on slightly alkaline or slightly acidic soils, although they prefer slightly acidic to neutral pH values.
When the crape myrtle is initially planted, it has to be watered often until it becomes established. Once they reach maturity, however, these plants have little water requirements and may survive on about an inch of water per week.
Although they have shown to be comparatively drought-resistant, remember that a lack of water during bloom season may lead to a less impressive display. If you endure a prolonged dry spell and you don't want your flower output to suffer, try to supplement rainfall with routine watering.
Thermodynamics and Humidity
The Acoma crape myrtle thrives well even in hot areas and is tolerant of humidity or drought, like other crape myrtle kinds that flourish in the sun and heat.
On the other hand, it can often effectively resist temperatures as low as zero degrees Fahrenheit and is hardy in USDA zones 7 to 9.
Fertilizer
You may need to fertilize your crape myrtle to get the greatest blooms. Even while these plants may thrive in low-nutrient soil, they nevertheless need enough nitrogen to maintain bloom development.
Consider fertilizing your Acoma crape myrtle using a balanced formula, such as an 8-8-8 or 10-10-10, if your soil is deficient. The fertilizer may be administered at the beginning of the growth season and should be spread as soon as it rains, unless appropriate watering is provided subsequently.
While the proper quantity of fertilizer may bring out your crape myrtle's greatest qualities, an excessive amount might have the opposite effect. Don't overfeed your plants with fertilizers; doing so might result in excessive leaf growth and fewer blooms.
Acoma Crape Myrtle growth
Cuttings are the most effective method of propagating Acoma crape myrtle. Along with root cuttings, you may also employ soft or hardwood cuttings.
To reproduce from cuttings, use the following actions:
To remove hardwood or softwood cuts, use clean scissors or garden shears. Cuttings from hardwood should be roughly eight inches long. Once the tree has gone dormant for the year, usually in the late autumn, take hardwood cuttings. Softwood cuttings should grow around six inches long and have many nodes when they are taken in the spring or summer.
Leave approximately an inch of the cutting above the soil line when planting the cutting in a container filled with good potting soil.
Keep the soil wet, and place the container where it will get lots of sun. In approximately a month, softwood cuttings should start to grow again. Although they will develop more slowly, hardwood cuttings won't be ready for planting until the summer.
The cutting may be placed outside after it has established roots and begun to generate new growth. Place your new plant in an area with plenty of light and give it plenty of water.
Acoma Crape Myrtle toxicity
You may relax knowing that this tree will not hurt your dogs or other animals if you're worried about them nibbling on your crape myrtle. The Acoma crape myrtle is safe for both people and animals to consume.
Pruning
Light pruning may keep your Acoma crape myrtle looking excellent; it's best to do this in the spring before the heavy foliage covers the branches.
It won't need substantial pruning to maintain its height since this hybrid type is renowned for having a tiny shape, but you could wish to tidy up low branches to highlight the tree's lovely red-and-white smooth bark.
Additionally, pinching off new growth will urge your crape myrtle to grow fuller and bushier rather than higher, which will stimulate the tree to develop more branches. Remove wasted blooms as well to encourage more blossoming.
Typical Pests
One benefit of this hybrid species is greater resistance to powdery mildew, a disease that often affects crepe myrtle trees. Aphid infestation is still a problem for Acoma trees. This may result in a black mold, but it won't really endanger or harm the tree.
2
1
sososo:wow😯
文章
atastybellpepper
2022年07月04日
Are you seeking for techniques to enhance the health of indoor plants? The best techniques to encourage your indoor plants to flourish are listed below.
How to Get Houseplants to Grow Well
Prudently water your plants. Always soak your plants completely and allow water to flow through the drainage hole. Never leave your plant submerged in water for a long time. Before watering again, wait until the top one to two inches (2.5–5 cm) of soil is dry. A nice balance between underwatering and overwatering is what you're seeking.
the timing of fertilization. During the busy growth season, be careful to fertilize often. Most of your plants will slow down or cease growing entirely when winter arrives, with its much less light and lower temperatures. Throughout most circumstances, you may cease fertilizing in the winter unless your plants are growing under grow lights.
Keep your plants away from any hot sources so that neither the foliage nor the plants will burn. Fireplaces and heating ducts may fall under this category.
fend off pests. Keep an eye out for pests on your indoor plants and take action before they become a problem. Keep an eye out for pests like scale, mealybugs, and spider mites. Treatment and early diagnosis are crucial. Use insecticidal soap, neem oil, or any other treatments suggested for a particular bug on your plants if you see any pests.
If your air is dry, particularly if you use forced air heating in the winter, increase the humidity. Dry air is terrible for your skin as well as your plants. Make sure that the bottom of the pot doesn't contact the water's surface when you place your plants on top of a tray containing stones and water. Also possible is using a humidifier.
Clean up your leaves. The accumulation of dust on plant leaves may hinder photosynthesis and attract pests. Keep your plants clean to maintain clean leaves. Use a moist cloth to remove any bigger leaves, or you may spray your plants with water outdoors, in the sink, or in the bathtub.
Your houseplants should be pruned occasionally, particularly if they have become lanky. This will promote new growth and make the plants bushier and fuller.
1
1
sososo:thanks😍
文章
atastybellpepper
2022年07月04日
New orchid growers quickly learn that good orchids cannot thrive in ordinary potting soil. Most orchids really grow in the air; the medium is only there to provide the roots with something to adhere to since it is too thick and doesn't drain well enough. In addition, the variety of orchid potting material options might be perplexing.
Many orchid cultivars may thrive in a medium with only one element, while others only like certain materials. You may create your own unique orchid mix, but you must first learn about the requirements of your specific plant. Additionally, depending on the medium used, a wide range of high-quality orchid growth mixtures are available that provide various advantages.
Cost, availability, and appearance may enable you to make a more specific decision among all of these possibilities. It's wise to educate yourself on the characteristics of each kind of material to aid in your decision.
Brick pieces and paving stones
Brick fragments provide hefty orchid pots weight and stability. However, since it may be so hefty, you should go for lesser sized pieces. Because of this material's moderate water retention, the humidity around your orchids will be higher.
The bottom half of an orchid pot may also be secured with cobblestones as an anchor. Top-heavy orchids like dendrobiums can stand erect because the little, irregular pebbles are weighty. Since cobblestone won't hold onto water, you'll need assistance improving the drainage capabilities of your orchid mix.
Coconut Husk Chips with Coir
The fibrous central core that surrounds the fruit, known as coconut coir, may be used on its alone or as a component of a unique orchid combination. In order to provide orchid roots with wet but not soggy growth conditions, the long fibers collect moisture while also releasing it fast.
Coconut husk chips, a sustainable resource, are available in various sizes to suit your requirements, whether they be as a stand-alone growth media or an addition to potting soil. As a result of the chips' gradual decomposition, the roots of orchids get the most air possible. Plaques made of cocoa husk fiber, which provide a great substrate for growing orchids on mounts, are also used by many orchid gardeners.
Cork
The waterproof characteristics of cork are known to everyone who has a vintage bottle of wine. For the best orchid mix, combine water-shedding cork with water-absorbing sphagnum moss or finely chopped bark. The bigger cork chips have a lot of nooks and crannies that orchid roots may explore.
Aggregate of Expanded Clay
Some orchids are sold with potting soil that contains pebbles that resemble Cocoa Puffs cereal. If you see them, it's highly probable that the plant you bought was grown in a clay aggregate that has been extended, such as Aliflor or Hydroton Clay Pebbles.
These ceramic pebbles differ from conventional rocks in that they are porous, light, and neither acidic nor alkaline. To give the pots of your orchids a consistent look, you may use them as a mulch on all of them, combine them with other growth medium, or use them alone.
Rock of Lava
This inorganic growth media is often used with orchids brought in from Hawaii. Lava rock is an useful potting mix addition for orchids that don't want to have their roots disturbed since, like other rock growth medium, it won't decompose. Lava rock holds onto water, which raises the humidity level for your orchids.
Perlite
Perlite, commonly referred to as sponge rock, is made when volcanic glass is heated to a high temperature. Perlite provides great water retention and aeration qualities while without providing any nutrients to orchid plants. Due to the fact that most nurseries and garden stores have it on hand as a general soil supplement, it is also a fairly simple media to locate.
Pumice
Pumice The granite is very porous and may store as much water as 50% of its weight. Additionally, because of its modest weight, your plant won't be burdened by it.
Stone Wool
The cotton-like chalk and basalt fibers known as rock wool, sometimes written rockwool, may be purchased online or at higher-end gardening supply shops. Its major benefit is that it won't degrade in your orchid potting mix. However, you will need to add some organic material, such as bark or peat moss, to balance the alkalinity of the rock wool cubes.
Peeled bark
cypress, cedar, and fir tree bark that has been shredded. It is one of the most often used materials in orchid pots, particularly those that are offered to novices at flower stores and nurseries.
As the bark decomposes, it will acidify your orchid mix. It is also liked for its organic appearance and lovely scent. But once a year repotting may be necessary for orchids grown in a bark media.
Sphagnum moss Sphagnum moss, which is weed- and pathogen-free, keeps the soil around your orchid roots wet. However, it won't become soggy, which is why it's a popular option. For the greatest results, you should rehydrate the moss (which is sometimes supplied in compacted bricks) and place it loosely into the orchid planter.
Growing Styrofoam Orchids in a medium made of Styrofoam may be successful if they like dry times. Simple Styrofoam peanuts may function as a growth medium and are an environmentally good choice since they allow you to recycle the usual packaging material. Additionally, you may purchase specialized Styrofoam pellets like Aerolite that are created especially for epiphytic plants like orchids.
Vermiculite
Several potting soil additions are sold at garden centers, and vermiculite is often among them. It often appears as gravel-sized particles in many pre-made potting soil mixtures.
This pale brown mineral is effective in retaining nutrients and water. Additionally, vermiculite aids in aerating potting soil. Sphagnum moss and it work well together to make a light, moisture-retentive orchid mix.
0
0
文章
atastybellpepper
2022年07月04日
Do you have a short attention span and need immediate pleasure from your houseplants? Numerous houseplants have a rapid growth rate, so you may enjoy them right away. Let's look at some indoor plants that grow quickly.
Houseplants that Grow Quickly
Pothos is a vine that grows very quickly and is also simple to cultivate. Your pothos, commonly known as Devil's Ivy, may grow significantly in just a few weeks if you provide it with optimal growth circumstances. Pothos enjoys more shade, so water it when the soil's surface dries up.
Many ferns, notably the well-known yet elusive maidenhair fern, have quick growth rates. Making sure that the soil around ferns never fully dries out is essential. The majority of ferns like to thrive in more shaded areas with little to no direct sunlight.
Another quick-growing plant is arrowhead vine. These plants are often short and bushy when bought. Don't worry if these plants expand when you get them home since they are really vining plants. If you want a bushier appearance, prune it back or give them a climbing support.
Hibiscus makes a beautiful and quickly growing houseplant if you have extremely warm and sunny windows. Give them the sunniest window you have and make sure they have plenty of water. They'll repay you with an abundance of big flowers and provide a touch of the tropics to your interior environment.
Another fast-growing indoor plant is the spider plant, which also has the advantage of being simple and quick to reproduce. For the optimum development, water when the soil's surface is dry and provide them with plenty of bright indirect light. On the plant, perfectly shaped plantlets with roots will grow, making them simple to spread.
If succulents are your preference, aloe vera grows very quickly for a succulent. They can withstand a bit more neglect than other plants since they are succulents. Give them lots of light and the most sunny window you can. They will repay you with rapid development and an easy ability to produce puppies at the plant's base.
Try a peace lily if you want a plant that can survive in reduced light levels. These plants bloom inside, have lovely leaves, and are proven to eliminate several pollutants from indoor air.
There are varieties of philodendron plants for any taste, ranging from quickly growing vining plants like the heart-leaf philodendron to bushier plants like the philodendron 'Xanadu. When the soil's surface is dry, water it, and provide them with a lot of bright indirect light. These shouldn't be exposed to direct sunlight as they will turn yellow.
These are among the quickest houseplants you can grow inside, but there are many more options.
1
0
文章
atastybellpepper
2022年06月29日
The lovely, simple-to-grow Echeveria peacockii succulent, which is native to Mexico, thrives well inside and outdoors in warm climes. It is distinguished by spoon-shaped, rosette-shaped, powdered blue-gray leaves with scarlet ends. Although these succulents grow slowly, under the correct circumstances they may reach a diameter of up to six inches.
Care for Echeveria Peacockii
Echeveria peacockii is a great option if you're seeking for a low-maintenance plant. These succulents may survive without watering, if they are placed in a bright, sunny area. In the spring or early summer, your Echeveria peacockii could even please you with a display of lovely pink blossoms. These beautiful, bell-shaped blooms have long stems that emerge from the center of the rosettes and bloom for two to three weeks.
Light
Sun-loving succulents like Echeveria peacockii need a lot of light to promote strong growth. Give them as much light as you can while growing plants inside, either via a window that faces south or west or under a grow lamp. Echeveria peacockii should be placed in areas that get some shelter from the sun's most intense rays when cultivated outdoors, particularly in hot climes where it may burn the fragile leaves.
Soil To prevent water from pooling around the roots of these succulents, they need potting soil that drains properly. The Echeveria peacockii thrives in commercially available cactus and succulent mixtures, or you may build your own at home with relative ease. To make a mix that is gritty, airy, and well-draining, combine equal portions of ordinary potting soil, coarse sand, and perlite.
Water
Although exceedingly drought-tolerant, Echeveria peacockii is sensitive to overwatering. Generally speaking, it is preferable to underwater these succulents as opposed to overwatering them. Between waterings, the soil should be given enough time to completely dry out. Keep water out of the rosette at all times.
Thermodynamics and Humidity
Echeveria peacockii, a native of Mexico, prefers warm, dry weather and cannot endure freezing. In USDA zones 9b through 11b, they may be grown outside all year round; otherwise, if you want to plant these succulents outside, you should put them in pots that you can bring inside during the winter.
Fertilizer
These Echeveria do not need routine fertilizer since they are used to thriving on subpar soils. In fact, over fertilization might actually have the opposite effect of what it is intended to achieve—leggy growth and fertilizer burn. However, to encourage healthy development during the active growing season, plants may profit from an annual application of cactus/succulent fertilizer in the early spring.
Echeveria Peacockii regrowth
Cuttings or leaves work best for propagating this Echeveria. To spread a plant by means of its leaves, carefully twist off one of the plant's healthy leaves, being sure to preserve the leaf's base. Put the leaf (or leaves) in a spot with strong, indirect light, on top of a soil mixture that drains well. Before watering, wait until roots start to emerge from the end of the leaf, and then water sparingly. You should see a little succulent sprouting at the end of the leaf after a few weeks. The old leaf will eventually die and fall off as the new succulent ages, at which time you may repot it and continue your regular maintenance routine.
A mature plant may sometimes produce offshoots, at which point it may be reproduced through cuttings. Separate the offshoots from the parent plant using a clean, sharp knife, and then let them alone for 24 hours so the wound may callus over. After that, put the cutting's stem in a soil mixture that drains well and set it in a spot that gets plenty of indirect light. After a few weeks, roots should start to emerge; at this time, you may start watering the cutting.
Echeveria Peacockii Potting and Repotting
Echeveria peacockii are slow-growing succulents with shallow root systems that don't need frequent repotting. Only once the succulent has outgrown its previous potting container can they be repotted; at that time, they may be moved up one pot size. Before repotting, make sure the soil is completely dry. Also, be cautious handling the root ball while repotting since the roots are quite fragile and brittle. Take out as much dirt as you can from the roots and replace it with fresh soil. To assist the new soil hold the roots in place around the roots, thoroughly water the freshly planted succulent.
Common diseases and pests
Echeveria peacockii are susceptible to certain common pests like scale and mealybugs but not any significant illnesses or pests. These succulents are prone to root rot because they are so sensitive to overwatering. To avoid overwatering, plant your Echeveria peacockii in a soil mixture that drains well and water only when the soil is completely dry.
0
0
文章
atastybellpepper
2022年06月28日
You have the exceptional chance to grow an avocado tree outside in your yard if you reside in the southernmost point of the United States or further south. The creamy fruits of these tall, evergreen fruit trees are prized for their wealth of health advantages. The rich, vivid green foliage of the tree is also cultivated for its aesthetic appeal. But it's crucial to remember that this tree's whole body, including the fruit, is poisonous to a variety of creatures.
Avocado Tree Planting Instructions
Avocado trees should ideally be planted outside in the spring. This gives the tree plenty of time to establish itself before the chilly winter weather arrives. This is particularly crucial in the hardiness zones for avocado trees in the north. Select a planting place where there will be enough space for these tall trees to flourish. If you're planting more than one avocado tree, space them at least 30 feet apart and at least 10 feet away from any buildings.
Remember that avocado trees have very delicate roots, so while planting them, try to avoid disturbing them needlessly. Excavate a hole that is larger than the root system. Since planting a tree too deep or too shallowly might lead to issues, the depth of the hole should typically equal the height of the root ball.
Very young, delicate, and immature trees may benefit from support since the trees are sensitive to strong winds. Your tree will stay upright and healthy if you choose a planting place that provides wind shelter. Just make sure your tree gets lots of sunshine and soil that drains adequately. Before planting, amend the soil with sand or similar well-draining substrate if the soil isn't in the best possible condition. It is also possible to cultivate avocado trees in containers, although this will ultimately restrict their development.
Care of Avocado Trees
Light
The avocado tree need a lot of sunlight to grow, like other tropical plants. Give this tree at least 8 hours of direct sunshine every day when you plant it. Although these trees may tolerate some shade, full sun is optimum for their growth and fruit production.
Avocado trees like loamy, rich soil that drains well. In order to prevent root rot, it's crucial that the soil be aerated and doesn't retain too much water. Ideal soil pH ranges from 5 to 7, which range from acidic to neutral. Alkaline soil may harm these trees.
By adding a layer of mulch all around the tree, you can preserve its shallow root system and help the soil retain the correct amount of moisture. In order to prevent smothering the roots or creating collar rot, be sure to keep the mulch approximately 6 inches away from the base of the tree.
Water
Deep, infrequent irrigation is beneficial for avocado plants. This promotes root development that is stronger and deeper. Wait until the soil starts to dry up before providing enough watering. The avocado tree may need more regular watering throughout the summer when it is hot and the weather may be dry. Young trees also need to be watered more often as they grow. Around 2 inches of water per week should be given to mature trees.
Thermodynamics and Humidity
Unless you want to grow an avocado tree inside, these well-known fruit trees can only be cultivated outside in USDA hardiness zones 9–11, restricting them to tropical and subtropical regions. They like growing at temperatures between 50 and 85 degrees Fahrenheit and are frost-sensitive.
Fertilizer
An avocado tree will produce more fruit and develop healthier if fertilized throughout the growing season. Depending on the exact directions contained with your selected fertilizer, begin in the late winter or early spring and continue feeding until the autumn. Make sure the fertilizer you choose has high levels of nitrogen since this tree needs it. It works well to use fertilizers made particularly for citrus or avocado plants.
Pollination
An avocado tree may be challenging to pollinate. These trees have blooms that have both female and male components, or what are known as "perfect" flowers. The female and male sections of avocado tree flowers bloom at different times, making self-pollination feasible but not always successful. It is essential to have two avocado plants for best pollination.
There are two types of avocado trees: type A and type B. The male portions of Type A trees open in the afternoon of the second day after the female parts open in the morning of the first day. The male portions of Type B trees open in the morning of the second day, whereas the female parts open in the afternoon of the first day. Cross-pollination between the two varieties is made feasible by these various timeframes. For the greatest outcomes, plant both type A and type B trees when selecting which ones to plant.
Avocado Tree Types
The three primary kinds of avocado trees are Mexican, West Indian, and Guatemalan. There are a number of avocado varietals available within these categories.
Hass: One of the most well-liked avocado kinds, you can often find Hass avocados in supermarkets. It is a cross between the avocado cultivars from Guatemala and Mexico. This tree is a type A, and its fruits have thick, rough surface and a creamy, rich inside. In comparison to other types, it is more heat sensitive. When cultivated independently, Hass avocado trees are known to generate a respectable amount of fruit.
Fuerte: The Fuerte avocado, another well-known variety, is a type B tree that is often planted alongside Hass avocados. This type is also a cross between Mexican and Guatemalan strains. Large, oval-shaped fruits with generally smooth, thin skin that comes off easily are produced by these plants. The fruit's oil content is lower than that of Hass avocados. These trees are better suited for the northern limits of the avocado growth zones since they are also more heat-sensitive.
Pinkerton: This Guatemalan tree of type A is well-liked for its compact stature and abundant fruit production. It yields oblong fruits with flesh that is creamy and luscious, much like the Hass avocado. To give a sizable crop, these plants need an avocado tree of type B.
obtaining avocados
Since avocados need a lot of time and commitment to develop, picking them from your own garden is fulfilling. You may anticipate fruit on nursery-purchased trees in three to four years. Avocados grown from seeds might take five to thirteen years to bear fruit.
Wait until the avocado reaches its full size once the fruits start to emerge. Avocados are harvested as soon as they reach their full size since the fruit does not ripen on the tree. Bring the avocados indoors, where you should let them to ripen on a counter. Test the avocado's suppleness by giving it a little squeeze. Enjoy the results of your labor after the meat is tender but not mushy.
Growing Avocado Trees in Containers
Avocado trees can be preserved in pots, however they won't grow to their maximum height in them. Due to the ease with which potted trees may be relocated to a sheltered place when cold weather strikes, this is perfect for tiny yards or gardens close to the northern limit of the avocado's growth zones.
It is best to choose young trees or dwarf kinds since they will remain tiny for a while. Make sure the container you choose has unblocked drainage holes and good drainage. Breathable materials, like terra cotta, are a wise option since they allow both air and water to pass easily through the container. Sand and compost are examples of well-draining soil you may use to fill the container.
Pruning
Avocado tree pruning will promote more controllable, bushy growth. Starting while trees are young is ideal. If the plant was produced from seed, begin trimming when it was just 6 inches tall by chopping off the top pair of leaves. Trim back 6 inches after it reaches a foot in height. After that, trim the tree every year.
Mature trees need to be pruned every so often to keep them tidy and provide enough room for light and air to pass through. While extensive pruning should be done in the early spring, light pruning may be done at any time of the year. Any low-hanging branches should be removed to maintain the tree tidy and accessible. To provide enough light and ventilation, prune dense regions. Dead wood should be pruned and V-shaped branches should be removed. If you want to maintain the tree on the smaller side, keep pruning the tips off the branches. Always start off cautiously and just cut down a third of each branch's length at a time.
Trees for Avocados to Be Grown
Grafting, layering, or cuttings are often used for propagation. The greatest time to propagate is in the spring when there is a lot of fresh growth. While layering and beginning cuttings are used to create duplicate plants, grafting is often used to blend the beneficial traits of two distinct avocado kinds. Here is how to carry out each propagation technique:
Cuttings
Sharp scissors, potting soil that is both wet and well-draining, a tiny container, and IBA rooting hormone are all required.
Choose fresh growth in the spring that is 5 to 6 inches long and has a number of unopened leaves.
Cut the branch of the new growth at a 45-degree angle using sharp shears.
By scrubbing the bark on each side of the cutting, you wound the cut end. This will promote the growth of roots.
IBA rooting hormone is applied to the cutting.
Bury the cut end in a wet, drained area of the ground.
Place the cutting in a sunny spot while keeping the soil wet.
Gently pluck the cutting to check for resistance after a few weeks; this shows that the cutting's roots have grown. Repot the cutting either outside or in a bigger pot.
Grafting requires the use of sharp snips, a knife, and a covering material, such as grafting tape, to protect the grafted region.
Just like if you were taking a cutting, do steps 1 and 2.
Remove the cutting's tip and any leaves it may have at that time.
Then, make an incision in the tree you want to graft onto by shaving off some of the bark.
Make sure the cambiums of the tree and the cutting are in contact.
Make care to cover any exposed portions before fastening the cutting to the tree.
The grafted branch and the parent tree should merge together in a few weeks.
Air Stacking
To attach the rooting media around the tree, you will also need rope or tape, as well as a rooting medium that may be wrapped around a limb.
Choose the branch you want to use for your new tree.
Cut two rings around the branch with a clean knife to expose a portion of peelable bark.
After the bark has been taken off, scrape the interior branch to remove the cambium.
Compost in a tiny bag (make sure the compost is surrounding the branch, not the bag) or another rooting media may be used to cover the exposed inner branch. Enclose the branch in safety.
It should take several weeks for roots to form. Cut the branch below the newly created roots if this happens, then plant the new tree.
Avocado Trees: How to Grow Them From Seed
A easy and enjoyable endeavor is growing avocado trees from seed. It's crucial to remember that seeds do not always result in trees that are exact replicas of their parent plants. A tiny pot, well-draining potting soil, toothpicks, a sharp knife, an avocado seed, and a container of water are all need for this project. then adhere to these guidelines:
Make three or four holes all the way around the avocado seed with a sharp knife.
Put the toothpicks through the openings. By doing this, you'll build the supports the seed needs to float in the water.
Put the seed's thick, or bottom, end, into the water. The water should contain around one-third of the seed.
Place the seed in direct sunlight, and replace the water every day.
After a few weeks, the top of the seed should develop leaves and roots.
After that, carefully put the seed in a soil that drains properly.
Overwintering
Avocado trees don't need special care in the winter when they are cultivated in the right zones. It is ideal to maintain trees in pots so they may be moved inside or to a location shielded from cold weather if they are grown on the northern borders of their growth zones.
Typical Pests and Plant Illnesses
Mites, caterpillars, borers, lace bugs, and thrips are a few typical pests that may trouble an avocado tree. Cankers, fruit rot, sun blotch, and root rot are a few diseases. Be on the lookout for these pests or any early illness symptoms. The best method to address any emerging issues before they endanger the health of your avocado tree is to take quick action.
1
0

Linda's Garden
2020年07月12日

Camellia
There are three kinds of Camellias in my garden. I am not sure their names, always recognize them by the color. Red, white, white with pink edges and pink. The pink one is the biggest, sometimes the flowers grow as big as my palm, they are all left by the previous house’s woner, thanks for them. Now, it is beautiful camellia’s season in NZ.


There are three kinds of Camellias in my garden. I am not sure their names, always recognize them by the color. Red, white, white with pink edges and pink. The pink one is the biggest, sometimes the flowers grow as big as my palm, they are all left by the previous house’s woner, thanks for them. Now, it is beautiful camellia’s season in NZ.
0
0